Sunday 28 February 2016

Refresh - Spring is in sight!

Morning everyone - well spring is almost here - I am totally loving the days staying lighter, am almost at the stage where I don't need my car lights on back and to, to work.  Definitely a great sign.

I realised that I haven't shared the couple of cards I created using the Wavy Dinkie Sheep Stamp set from Little Claire Designs and so am putting that right!

Here are my makes created in bright cheery spring time colours:


I have added glossy accents to the sheep.  Both stamps coloured using promarkers, backing papers are from Little Claire.  Bee ribbon from "the stash"  Simple matting and layering - faux border created on both using a fine micron pen and ruler.

Hope you like my duo...........getting on with a to do list today - and then hope to have a crafty play later.....once I have sorted out my costume for World Book Day on Thursday at school - Newsround are coming at 8.00am to film......wig ordered......Lady MacBeth Dress ready....once ironed....now where did I put my knitted tights......mmmmm xxGaynor

Saturday 20 February 2016

#66 Love and Marriage Little Claire Designs

Hi,

Love and Marriage our theme for Blog Challenge #66 over at Little Claire Designs.  I really was spoilt for choice deciding which image to use to create my challenge card.

Please join in with our challenge - we really are a friendly bunch and appreciate everyone who shares our passion - bet there are loads of fabulous Valentine makes!!

As always there is a fabbie prize on offer and our top three awards.

So I decided to return to one of my old favourites : Swirly Whirlies Cats  I have gently added pastel colours - I appreciate not easy to see - pink and blue which matches the collars of our two fur babies - Isla and Billy and crystals to accent.  I have also used Little Claire Design Dinkie Text Sentiments and Stripy Backing Papers.

Sorry image is side on..................I blame blogger :)

I extended the border from the design by masking off part of the image with a post it note.
Added a little heart button to the bow for extra dimension.  Faux border created with my micropen and a ruler.  Hope you like my little bit of inspiration.  Off now to check out my design teamie makes. xxGaynor

Thursday 18 February 2016

Wavy baby - Little Claire Designs

Hi,

Am prepared - a friend from work is due her first baby any day...........yes I have made two cards - using an additional fabulous Wavy Stamp Set from Little Claire Designs - Baby.


Fabulous Owl Monotone backing papers from Little Claire Designs.  More little waste hearts from the stash - all gone now......now to track down the die I used ha ha!

I wonder do you have a preference to the designs - just waiting on news now whether it be a little bundle of boy or girl..................xxGaynor

Tuesday 16 February 2016

Wavy Wedding from Little Claire Designs

Morning to you,

Phew nearly up to date with all my postings - today a share using the fabulous Wavy Wedding Set from Little Claire Designs........we will soon have a "wave" for all events - they are so cool.

Talking of cool - I decided to winter theme my first card:


Both cards have used Little Claire Designs backing papers.  More ribbon from Llandudno, glamour dust and glossy accents.  A few tiny hearts which were waste from a die - safely stashed in case of need......Clear crystals, micropen borders and "jobs a good-un!"  Choice of sentiments are included in this set,  xxGaynor

Sunday 14 February 2016

Last of my 5 new Dinkie Designs

Hi,

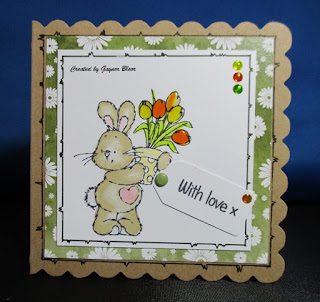
I really love this cutie image - he will fit on so many designs and with Mother's Day coming up and Easter a winner!

Here is the link to a bargain buy from Little Claire Designs:  5 stamps for £8.00


Same stamp used on both cards - the top card is 6 x 6.  Love the Daisy design backing papers from Little Claire Designs - used on both cards.  I may use the first for my Valentine card for my hubbie......or for my daughter to let her know how much I love her.......son will be expecting one from his girlfriend..............Hope you like my little borders - ribbon bargain buy from a craft place in Llandudno - really proud of myself I normally hang on to treasures for so long but have been good and not stashed - a definite result for me :)

I have added glossy accents to the tulips and mirrored the promarker colours with adhesive gems - yes from the stash!

I'd really appreciate any comments that you may be kind enough to leave ......gets a little lonely in blog world at times......................cheerio for now xxGaynor

Friday 12 February 2016

Bee Happy from Little Claire Designs

Hi,

Another amazing design suitable for so many events. Little Claire Designs Dinkie Little Bee Stamp
you can't fail to smile at this image.

Here are my couple of makes:


When creating the first card - I marked the stamped area adding the border.....oops......little disaster masked by adding an additional couple of bees from the stamped image - now did you realise why they were there?  I could of course have added blurb re extra dimension etc  But hey ho how many uh ohs when crafting become inventive and inspirational extras..............loads me thinks.

I have used punches on both cards to highlight the design.  Sentiments are from Little Claire Designs - Dinkie Sentiments: they really are a great little addition to the craft stash!

Yes of course glamour dust, adhesive stones and glossy accents............backing papers and cards from Little Claire.  xxGaynor

Wednesday 10 February 2016

Dinkie Chairman from Little Claire Designs

Hi,

I feel I am getting somewhere - and being a regular blog poster - not quite sure how long it will last :)

On with another couple of cards to share.  Dinkie Chairman


Backing papers and card bases are available to purchase from Little Claire Designs.  I have added glossy accents to the little dog and glass.  The sentiments are also from Little Claire - I have used the sentiment in the latter card to create a frame.  Coloured using promarkers......no glamour dust this time - yes some adhesive embellishments of course.....male or no male. xxGaynor

Monday 8 February 2016

Dinkie Hedgehog Treats from Little Claire Design Team

Hello,

Yes me again back to share an additional couple of dinkie card makes using the Dinkie Single Flower Hedgehog Stamp


This duo have been created as the hedgehog flower pot dinkie cards - with the added addition of a memory box die.  The die was originally too long for the cute dinkie cards and so has a little fold at the back.  I used a different glue to stick the die down - the glue was way too strong for the back of my hand......all the guilty pleasure of removing pva set glue disappeared and I had a very red and sore back hand......won't be playing that game again :(  xxGaynor

Saturday 6 February 2016

Delicious Dinkies form Little Claire Designs

Little Claire Designs has certainly been keeping the Design Team very busy of late and at last we can share:  Five new dinkies have just been released with delicious backing papers in both dinkie and large 6 x 6 size.

So on with my shares:


Th dinkie pot hedgehog stamp is just so cute - and I am all for smiles.  I have used the new backing papers on both - the second being stamped directly onto the backing paper.  Both are coloured using promarkers, have glamour dust, glossy accents and of course either adhesive nail heads or crystals.

I created the border on both using a black micropen and ruler......drawing straight lines then creating tiny blips / peaks for interest.  Off now to diarise more shares. xxGaynor

Thursday 4 February 2016

Friday Silhouette Project with Little Claire

Good morning all, Gaynor here with the weekly stamping blog project from Little Claire Designs. After sitting down recently to write cards for forthcoming birthdays it quickly became apparent  that I need to make lots of male cards...

So revisiting techniques - everything in crafting comes around time and time again perhaps with a little twist: I decided to create a block shading background and use a silhouette image.  There is no matting and layering on this card!

As per the norm here is my step by step tutorial guide using images:


My circle template is waste - it previously contained circle sentiments!

 Coordinating pigment inks.


Template fixed using masking tape.


My little extras to add further interest and dimension on my one layer card.


On the completed card I have added a faux border using a ruler and a black micron pen. Unfortunately the glitter added is not showing up on my picture......I added ultra fine glitter to the water ripples - it does add dimension and catches the light.....

This card is so easy to complete - needless to say a little production line followed - more to share at a later time.  Hope I may have inspired a little and that you like my make.  Cheerio for now.  xxGaynor